Millers Falls No. 226 Bench Drill Teardown and Cleanup
I first posted this article on the WoodNet woodworking hand tools forum in 2011.
I bought another hand cranked drill press last weekend at the PATINA tailgating sale, a Millers Falls 226 that has seen very little use. With a fair amount of dried grease on and in it, it has developed a mild case of rigor mortis. Over the next few days or weeks, I will take it apart, clean it up, and reassemble it. I have a couple of other hand cranked drill presses, and I can't wait to see how this one compares.
I apologize in advance that some of the pictures aren't terribly clear. It's a new camera, and I have much to learn.
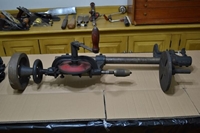
Here's the patient up on the dissection table (I had it in a bag to keep my kids out of it).

Checking the toe tag to make sure I have the right patient.

Amazingly, all of the bolts came out easily and none of the parts were frozen on. After removing the flywheel, the stop collar and thrust bearings slide off, and the handwheel can be unscrewed from the main casting.

Just a couple shots showing the automatic advance. Each revolution of the crank gear advances the gear (see the arrow in the first picture) by one tooth, pressing the spindle down.


Once the flywheel, collar stop, and thrust bearings are off, the spindle is free to slide out of the housing.

The spindle on its way out. This is another thrust bearing, but with tiny ball bearings. Really tiny ball bearings. Bearings that you can't see in this picture because they are safely in a Ziploc bag. They're in a Ziploc bag because when little metal balls bounce off of the bench and onto a 150 year old wood floor with gaping cracks, they are really hard to gather up. Even with a magnet.

With the spindle removed, there is nothing but dried out oil and friction holding the gears and speed changing collar in place.

An end view of the speed changing collar. This is as far apart as this will be taken, as I don't see a clean way of taking it apart further. It's too bad, as I am curious to see what the inside looks like. I'll just soak it in a solvent to free it up, then lubricate it.

Another view, hoping to show how the collar changes speeds. When you twist the outer knurled collar, the square spline (right arrow) slides up or down, and engages one of the slots (left arrow) in either the upper or lower gear, letting the opposite gear spin freely.

This is the main casting and gear/handle assembly after removal from the column. Just two pins left to go (one through the handle end and another through the gear end), and disassembly will be complete.

These pins are pretty easy to remove. They were never really tight, so a finishing nail with the tip cut off and filed flat works well to remove them. Don't leave the point, or you may mushroom the end of the pin, making it harder to remove. The pin on the handle end is similar.

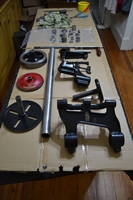
Here are all of the parts, taken apart as far as they will go. A few parts (such as the wood handle and crank arm, which are peened together) are not worth the trouble of taking apart, and will be left together.

Finally, these are the tools I used to disassemble the drill press. Nothing beyond ordinary household tools was required.

That's the end for now. All of the unpainted parts are soaking in gasoline for the night, in an attempt to soften up or remove the dried oil. The next step is washing and polishing everything else up. I plan to start with hot soap and water, and move on from there if I need to. It looks like there's still about 95%+ of the original finish left, and I want to save as much of it as possible.
I finally had a few hours yesterday and today to get this drill press cleaned up and reassembled. It turned out to be in exceptional condition. 95% of the paint is still there, and it is mechanically flawless. There are a few spots of patina, but they just add character.
First some pictures of the cleaning. With a lot of my tools in storage, I had to improvise a few things, so don't be shocked by some of the pictures that follow.
Cleaning up some of the parts on the lathe is definitely the fastest way to go. This is a branch that I turned to fit over the live center of my lathe, and will allow me to hold most of the round parts between centers so I can clean them up. This is the recess that will press onto the live center.

Turning the taper.

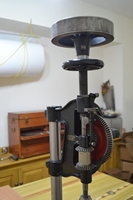
Cleaning the flywheel. The rest of the round parts were cleaned up similarly.

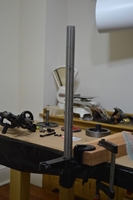
Cleaning the column. It looks a little scary, but actually worked pretty well. Having access to a larger lathe would definitely have made this a bit easier.

The chuck needed to come apart for cleaning. I held the knurled part in a clamp.

Makeshift spanner. A couple of drywall screw driven just through a 1x. It works well as long as the parts aren't frozen together too badly.

It worked like a charm.

The inside parts of the chuck. The jaws are in great shape, and the springs are all there (and unbroken).

The inside of the shell is pretty gunky. Without taking the chuck apart, it is nearly impossible to clean it up enough to operate really smoothly.

This worked well for cleaning the inside. I wrapped steel wool around a masonry bit, jammed the shell over the steel wool, and turned the drill press on. Thirty seconds later, the inside was slick as a whistle.

When I first took the drill press apart, this assembly would not come apart. After soaking in gasoline for a few days, it fell apart when I picked it up. This is the inside of the speed selector.

Another shot of the speed selector, showing how the metal tabs slide when the outer shell is rotated.

Finally ready for reassembly.
One of the thrust bearings. A little bit of wax or grease in the groove helped hold the bearings in place while I lined everything up. I really could have used three or four hands for some of this.

Reassembly was easier in the upright position. I didn't take any other pictures of putting it together, as it was simply the opposite of disassembly.
And here she is, restored to her former glory, and ready for another lifetime of service.


My daughter and son each took it for a little test drive, and both loved it. It's as smooth as silk, and drills as
nicely as it looks.